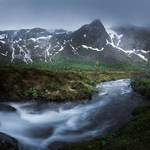
Think of an anchor as something for the eyes to rest on, something that is identifiable and clear, if you do not really know what you are taking a picture of(i.e point and shoot), the viewer won`t either.
Remove the small trees in the image above and it almost has an abstract feel to it, not something you can quickly identify.
Start your compositions with an Anchor which you can clearly identify and work from there.
2. Balance

2 and 3 are closely linked, but there is a key difference and why you want to look for balance before placement is due to the major adjustment you are doing when trying to balance an image.
At this point after you have found your anchor you start to balance the image, look at the ratio of foreground to mid- and background.
On the image above the dark rocks on the left with the small waterfall takes up a very large portion of the frame, almost making the image feel like it should lean to the left, but the river flowing diagonally into the sunset balances it out.
Balance in images is something you will instantly feel is off if you take the time and really look at how you are framing your image.
3. Placement
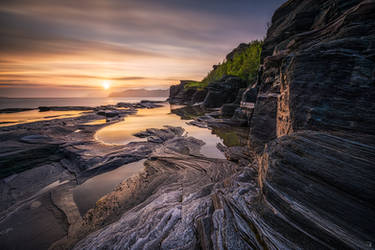
Once you have identified what you want to take a picture of, balanced out your image, now it is time for placement.
A single step to the left or right may make a huge impact on the look and feel of your image.
If I have made a couple of small changes with the image above at the time of shooting it would look completely different, the image was shot as low as I could get my tripod, and the sun placed in such a way to make almost every element in the image point to it.
Imagine the same image shot at eye level, tilted up to have 50/50 sky to ground ratio and finally turned more to the left.
This is where placement is key to bring your composition home, small adjustment will make or break your image.
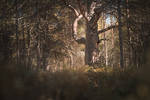
4. Separation

Like a fine wine, once you have your anchor, you have balanced it and found the most pleasing placement, then let the parts of the image breathe.
The image above I would say is a failure in that regard, I am quite sure you can see the problem as well.
If I had not been in a hurry to get to the next location(grass is always greener on the other side?
 (Smile)")
), I could have taken the time to make sure that the furthermost rock would not overlap with the mountains in the back.
The idea of the image I thought was very good and everything came together up until this very last point, I did not give all the different objects in the scene room to breathe.
*Overlapping objects is fine, but be careful about too little or too much.
Anchor - Balance - Placement - Separation 4 rules of composition is fore sure easier to remember than "The top 27 rules of composition", cause all those minor things automatically follows when using these four simple guidelines.
If you use these four rules to guide your composition I would not be surprised to see the rule of thirds being implemented without you ever really thinking about it.
Bonus: Check edges of the frameAt this point you have framed your image in a way you find really pleasing and now it is time to do a border patrol around the image. Even when all things looks perfect, suddenly you have a branch from a tree sticking into the frame.
This final point is often where I can bend a tree slightly so it does not disturb the view I have found, I often notice garbage people have left behind or even a single grass straw has to be picked before I click the shutter button.
The cool thing about this method is that once you really hit that amazing composition, you can just leave it as it is, boil some tea, watch the light change and shoot through the night until the weather makes your image look even better.
Hope this helps.
Have a great day.